How to Prepare a Paper Bridge Demonstration for Class
Prepare a paper bridge demonstration with a clear question, simple materials, and a recording plan so students can focus on what they observe.
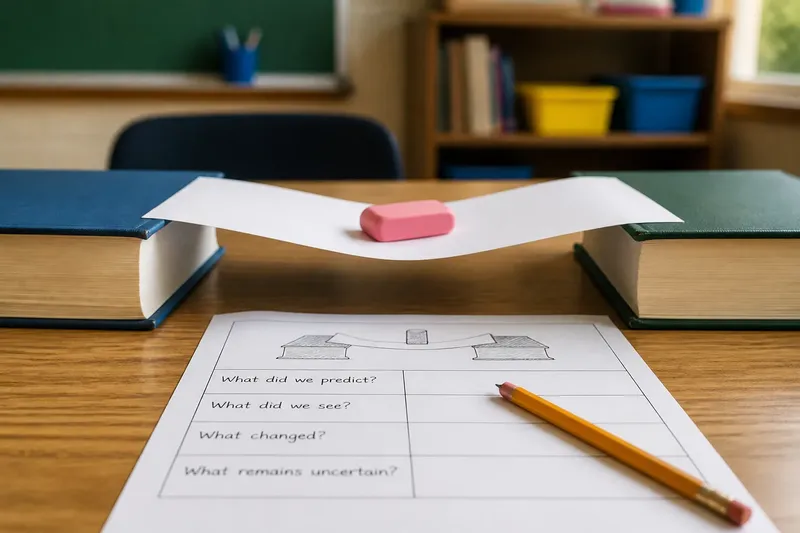
A paper bridge demonstration works better when the teacher decides what students should notice before putting paper between two supports. A clear question, a ready setup, and a simple way to record observations keep the activity from turning into an unplanned contest.
What should the paper bridge demonstration ask?
Choose one question that can be answered by watching the setup. For example: “Where does a flat sheet bend when it spans this gap under a small load?” That question directs attention to a visible feature without requiring students to settle a broad claim about how bridges work.
Decide what counts as an observation before class. Students might note whether the paper bends, slides, or stays in place. They can then offer explanations separately, rather than treating a guess about the cause as something they directly saw.
What materials and setup should be ready?
Gather ordinary paper, two stable supports such as books, a small classroom object to serve as a load, and a pencil with a recording sheet. Choose paper and a load that are easy to handle, and check that the supports sit securely on a clear surface. Keep the arrangement simple enough for every student to see.
Before students arrive, place the supports with a visible gap and lay the sheet across them. Keep the load nearby rather than balancing it in advance. This lets the class see where the object is placed and makes it easier to pause if the paper slips or a support moves.
Prepare a small record with four prompts: “What did we predict?”, “What did we see?”, “What changed?”, and “What remains uncertain?” A quick sketch of the supports, gap, paper, and load gives students a shared reference when they discuss the result.
What should be checked before students begin?
- Check that both supports are stable; if either rocks or slides when touched, reposition it before the demonstration.
- Check that the paper lies across both supports; if it misses one edge, recenter it rather than interpreting a slipping span.
- Check that the load is small and easy to place by hand; if it is awkward to handle, choose a more manageable classroom object.
- Check that students can see the middle of the span; if some cannot, adjust their seating or move the setup to a more visible surface.
- Check that the observation prompts distinguish visible events from explanations; if they invite only guesses about causes, rewrite them to ask what students actually saw.
- Check that the surface around the supports is clear; if objects could interfere with the setup, move them before starting.
How can you introduce the activity without giving away the answer?
Show students the arrangement, state the question, and ask for a prediction in a sentence or quick sketch. Avoid naming a preferred explanation. The point is to give students something specific to watch, not to make them guess the teacher’s intended conclusion.
Place the load gently and pause so students can describe what happens. If the setup shifts, say so plainly and treat the result as unclear rather than assigning a cause. A visible interruption is useful information about the demonstration’s limits.
How should students record what they see?
Use a short sequence: sketch the setup, write a prediction, describe the visible result, then add a separate explanation. That order gives students a record of what happened before they decide what it might mean.
Say you have two books, one sheet of printer paper, and a small eraser as the load. Students predict that the middle will bend. You place the eraser at the center; the paper curves downward but does not slide, so the class records “the middle curved; the paper stayed on both supports.” When a student suggests the paper was too weak, record that as an explanation, not as an observation. The result is a specific account of this setup, while the cause remains open for discussion.
What should students ask about the result?
Where did the paper bend?
Describe the location and visible shape in plain terms. If students disagree, ask them to point to the spot or sketch what they saw before choosing a shared description.
Did either support or the paper move?
Note any slipping or shifting, since it affects how confidently the class can describe the outcome. If something moved, record that condition and treat the result as limited.
What did the prediction get right?
Compare the prediction with the written observation, not with an explanation added afterward. If they differ, ask what the result suggests the class should reconsider.
What remains uncertain?
Identify what the demonstration did not establish, such as why the paper bent or whether another arrangement would behave similarly. If students want to answer that question, help them define a separate investigation.
How can you keep the discussion focused?
Ask students to point to their notes when they make a claim. “It bent in the middle” refers to a recorded observation; “the paper needs more support” is a possible explanation. Keeping those statements distinct is enough for a useful classroom discussion; no elaborate scoring system is needed.
It is not worth adding decorative charts or a winner’s ranking before students know what they are comparing. Those additions can take attention away from the modest task of noticing, recording, and asking what the evidence can support.
Keep the conclusion close to the setup: the sheet curved under the load in the arrangement the class observed. That bounded statement is more useful than declaring one paper design best. If students want to investigate further, help them state a new question and identify what they would need to observe.